Guide for podcasters
How to make podcast clips on your phone
Clips usually don’t get made because making them means sitting at a laptop with an editor open for an evening, and that evening never comes. The phone is already in your hand on the train, in a queue, on the sofa. If most of the work is done for you, the part that is left fits in those minutes.
The short answer
Upload the episode from your camera roll in Slice, in your phone’s browser, and let it find the clips while you do something else. When the email arrives, open each clip, trim the start if it needs it, check the title, and export. On an iPhone, Save to Photos puts the finished clip in your camera roll, ready to post.
Shorts by Slice turns a long podcast or stream into captioned vertical clips. $14.99 a month. Your first video (we search the first hour) and first 2 clips are free, no card. After that, buy clips one at a time or take the plan, which you can cancel any time.
Try it free →Why do it on a phone at all
Because the evening at the laptop is where clips go to die. A comment in an r/podcasting thread about clips sums up how common that is:
“I have hobby podcast for 2.5 years and I have only made a couple of clips from 200 episodes.”
That podcaster’s problem was not skill. It was that cutting clips by hand takes hours. If something else finds the moments and cuts them, what is left is checking and tidying, and that is phone-sized work.
What it looks like on a phone
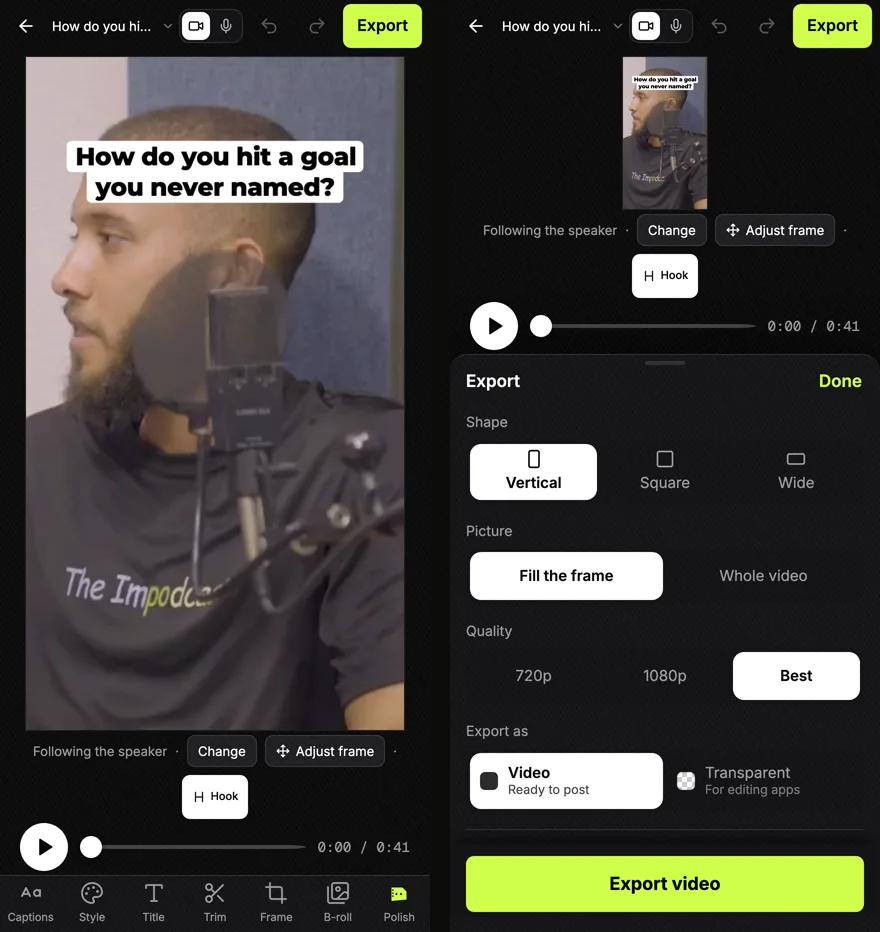
These are real screens, at the size of a large iPhone, on a clip Slice cut from The Impodcast, Episode 1 (CC BY 4.0). On the left, the editor: the clip fills the screen, the hook title sits across the top, and the tools are a row along the bottom. On the right, the export sheet that slides up when you tap Export.
Getting the episode onto Slice
Tap upload and pick the recording. If you recorded on the phone, it is in Photos. If someone sent it to you, it is probably in Files, or you can save it there from the message first. MP4, MOV or WebM, up to three hours and 4.5GB. Audio-only episodes work too: MP3, M4A, WAV, OGG or FLAC.
- Use Wi-Fi if you can. An hour of video is a big file, and it will eat a mobile data plan.
- Keep the page open until the upload finishes. If the phone locks or you switch away during the upload, it may stop.
- After that, close it. The transcript and the clip finding happen on our side. Slice sends you one email when the clips are ready.
What to fix with your thumb
Most clips need one or two small changes, and they are the ones the phone is good at:
| Tool | What you use it for on a phone |
|---|---|
| Trim | Drag the start past an “um” or a run-up, and the end to the line that lands |
| Title | Rewrite the hook title across the top, or turn it off |
| Captions | Fix a misheard name or word |
| Style | Pick a different caption look |
| Frame | Nudge the picture if a face sits too close to the edge |
| B-roll | Add a picture over part of the clip |
| Polish | Let Slice suggest a look and effects for the clip |
If you only do one thing, do Trim. The first second of a clip matters more than any other, and our guide to writing the first line of a clip explains why.
Exporting and saving to your camera roll
The export sheet asks four things: the shape (vertical, square or wide), whether the picture fills the frame or shows the whole video, the quality, and whether you want a normal video or a transparent one for other editing apps. For Shorts, Reels and TikTok, vertical, fill the frame and the best quality is the usual answer.
On an iPhone, the finished clip gets two buttons. Save to Photos opens the phone’s share menu; choose Save Video when the menu opens. Save to Files is the fallback. It goes to the Files app, in Downloads. To put it in Photos, open it there, tap Share, then Save Video.
On Android the share menu works the same way where the browser supports sharing a file, and otherwise the clip downloads. Either way, once it is on the phone you post it from TikTok, Instagram or YouTube like any other video. If you want it on a laptop instead, Email me this link sends it there.
What is still easier on a laptop
Being honest about it, a few jobs are quicker with a mouse and a big screen:
- Lots of caption edits. Fixing one word is easy with a thumb. Re-timing twenty lines is not.
- Several pictures in one clip. Placing and timing B-roll is fiddly at phone size.
- Two people on one camera. Checking the framing switches between speakers is easier when you can see the whole timeline.
A sensible split: upload and check clips on the phone during the week, and leave the one clip that needs real work for when you are at a desk. Our guide to turning one episode into a week of posts has a schedule that fits that.
Podcast clips on your phone with Slice, step by step
- Open Slice in your phone’s browser and upload the episode
Pick the recording from your camera roll or Files. MP4, MOV or WebM, up to three hours and 4.5GB. Keep the page open until the upload finishes.
- Put the phone down while the clips are found
Slice writes the transcript and finds the clips on its own servers, then emails you once they are ready.
- Open a clip and fix what needs fixing
The tools sit along the bottom: Captions, Style, Title, Trim, Frame, B-roll and Polish. Most clips only need Trim and the title.
- Tap Export
Choose the shape and quality, then Export video. Vertical and Best are the usual choice for Shorts, Reels and TikTok.
- Save to Photos and post
On an iPhone, tap Save to Photos and choose Save Video when the menu opens. Then post it from the app as you would any video.
Questions
Can I make podcast clips on my phone without an app?
Yes. Slice runs in the phone’s browser, so there is nothing to install. You upload, edit and save the clip from Safari or Chrome.
How do I upload a long podcast episode from my phone?
From the camera roll or the Files app, ideally on Wi-Fi because the files are large. MP4, MOV or WebM, up to three hours and 4.5GB. Keep the page open until it says the upload is done; after that you can close it.
How do I save a clip to my iPhone camera roll?
Tap Save to Photos after the export. Choose Save Video when the menu opens. If that menu does not open, use Save to Files: It goes to the Files app, in Downloads. To put it in Photos, open it there, tap Share, then Save Video.
Can I make clips from an audio-only podcast on my phone?
Yes. An audio-only episode uploads as MP3, M4A, WAV, OGG or FLAC; its clips are drawn with templates from the words, your cover art and the sound of the voices.
Is editing on a phone as good as on a laptop?
For trimming, rewriting the title, fixing a caption and exporting, yes. For moving many captions around, adding several pictures or fine framing on a two-person shot, a bigger screen is quicker.